We may earn revenue from the products available on this page and participate in affiliate programs. Learn More ›
Partner Story
Turn three high-impact home zones into practical summer upgrades with versatile VEVOR essentials designed to help homeowners take on more—without stepping up to contractor-level prices.
Summer is an opportune time to tackle some affordable summer projects that can elevate your house and yard. If you’re craving some more privacy from your neighbors, consider installing a garden trellis. For those evenings when you are entertaining or just looking to relax while gazing at the stars, a fire pit zone in your backyard can do the trick. Finally, if you need a place to tinker or create, convert your garage into a versatile workshop. Learn more about how to make these dream upgrades come true, including key tools you’ll want to have on hand.
1. Create a gravel fire pit zone in your backyard.
Project Overview
Best For: Unused space in the yard away from structures
Time: Weekend
Skill Level: Intermediate
Budget: $300 to $5,000, depending on scope and materials
A backyard fire pit is the ultimate centerpiece for outdoor living, serving as a natural gathering place for family and friends. When local weather and ground conditions are suitable, this can be a practical weekend project. And you can enjoy the benefits of this new amenity right away.

Important Considerations Before Installing a Fire Pit
- Location and clearance: Position the fire pit a safe distance from your home, property lines, and low-hanging tree limbs. Follow local fire codes, homeowners association (HOA) rules, and the fire pit manufacturer’s clearance requirements; keep the area clear of structures, overhanging branches, and combustible materials.
- Dimensions: A great total zone diameter is 12 to 15 feet to comfortably accommodate chairs placed 6 to 7 feet back from the flames. For the fire pit itself, an interior diameter of 3 to 4.5 feet and a depth of 1 foot is ideal for keeping conversations flowing.
- Material safety: Always select materials that stand up to extreme heat, such as specialized fire bricks to line the interior of your fire pit.
- Local regulations: Check your municipal ordinances and HOA guidelines regarding permissible fire pit sizes, depths, and fuel restrictions.
Basic Steps for Completion
- Mark and excavate: Outline your 12-to-15-foot seating zone; then dig down 2 to 3 inches across the entire footprint to clear out grass, sod, and debris.
- Lay the barrier: Roll out heavy-duty landscape fabric across the cleared ground and secure it with staples to block weeds from pushing through the gravel.
- Install the border: Secure your chosen edging material—such as metal, wood, or heavy border stones—around the outer perimeter to contain the gravel.
- Pour the gravel base: Fill a heavy-duty hauler like the VEVOR Garden Cart with gravel and dump 2 to 3 inches of gravel into the seating zone, smoothing it out with a garden rake.
- Build the fire pit ring: In the exact center, lay a base layer of retaining wall blocks. Stack a second and third row, staggering the joints, and follow the block and adhesive manufacturers’ installation guidance, particularly for materials used near heat.
- Line and finish: Line the inside walls of the block ring with clay fire bricks. Pour a few inches of protective lava rock into the bottom of the pit to stabilize the bricks and insulate the base.
Budget-Friendly Tips
To save some money, opt for gravel over pavers, as gravel is one of the most budget-friendly, low-maintenance landscaping bases available. Also, choose standard, affordable concrete retaining wall blocks, and burn firewood instead of investing in expensive gel fuel canisters or propane setups.
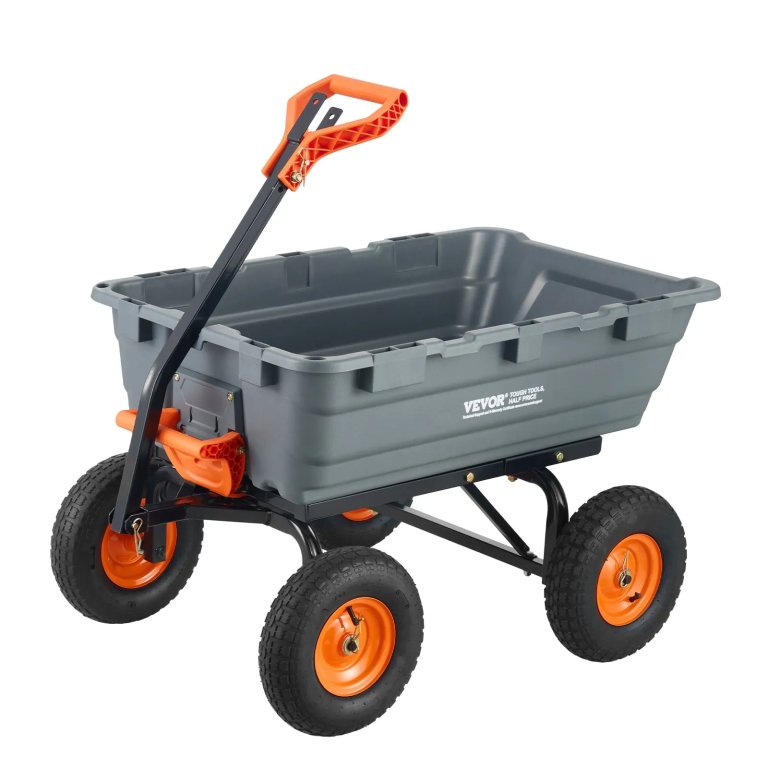
Photo: VEVOR
VEVOR Garden Cart
This heavy-duty dump cart has a steel bed, dual-purpose handle, can hold 1,200 pounds, and has a front-handle dumping frame to quickly unload items.
Photo: VEVOR
2. Grow your own privacy screen.
Project Overview
Best For: Outdoor sitting areas, side yards, or in a garden
Time: 2 to 3 hours
Skill Level: Beginner
Budget: $100 to $300, depending on scope and materials
Achieving a sense of solitude in your backyard can be tough, especially in tight lots. Rather than completely blocking off an area with a solid wall, VEVOR’s Garden Trellis offers a beautiful solution while still welcoming breezes, sunlight, and nature views. And over time, it transforms into a living architectural focal point that brings peace and long-term value to your property.
Summer is the peak growing season for much of the U.S., so installing your trellis now allows fast-growing summer annuals and perennial climbing vines to establish themselves immediately.

Important Considerations Before You Start
- Prepare before you dig: Building a trellis requires sinking stakes in the ground. Larger structures require digging deep fence post holes. Before beginning, be sure to consider where any drip irrigation lines run. If digging deeply, call 811 or your local utility location service to ensure you don’t accidentally strike underground electric, gas, or water lines.
- Plant selection: Determine what you want to grow: fragrant flowers (jasmine, honeysuckle, clematis), ornamentals (ivy, Virginia creeper), or climbing edibles (runner beans, cucumbers, squashes, or grapes).
- Lattice density: If you need immediate privacy, choose lattice panels with a tighter woven pattern. If you are relying on plants for privacy, then a wider grid will work.
- Secure plants: Use twine, plant ties, or garden clips to keep plants in place as they grow.
Basic Steps for Completion
- Map out your space: Choose the best location for the trellis, making sure it blocks unsightly utility boxes, is located in an area with shade, etc.
- Set the trellis: Install the trellis by following the manufacturer’s guidelines.
- Plant and train: Introduce climbing plants at the base of the structure, gently weaving them through the lattice to guide their upward growth.
- Accessorize: Elevate the aesthetic by hanging outdoor string lights, art, or small vertical garden planters directly onto the panels.
Budget-Friendly Tips
To save some money once your trellis is installed, plant fruit, vegetables, and herbs. You’ll gain a privacy screen while simultaneously lowering your grocery bill.
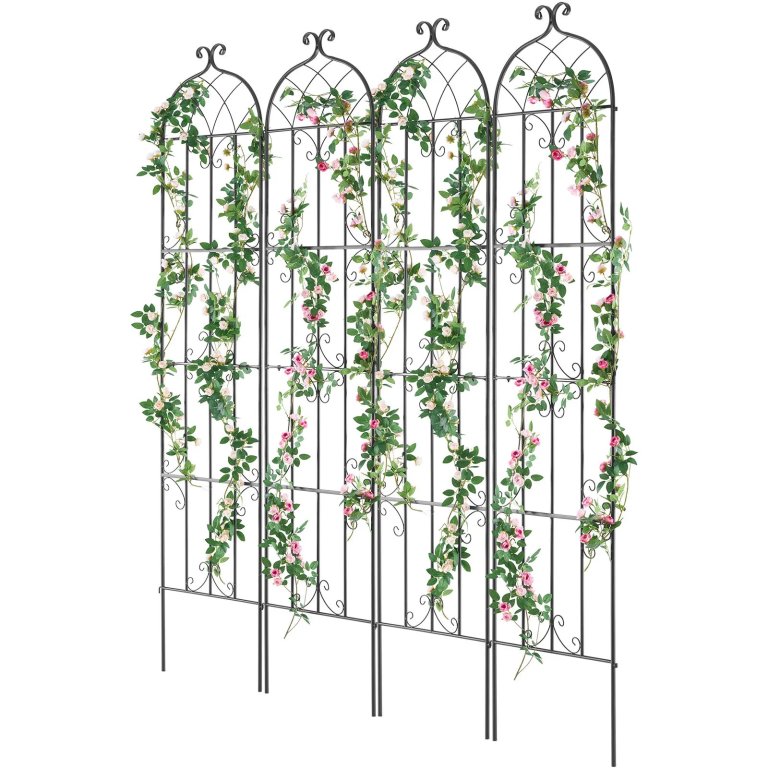
Photo: VEVOR
VEVOR Garden Trellis
This powder-coated steel trellis features a narrow footprint and a lattice grid that supports ivy, flowers, vegetables, and other climbing plants.
Photo: VEVOR
2. Convert your garage into a workshop.
Project Overview
Best For: DIYers with a garage
Time: Weekend
Skill Level: Beginner to Intermediate
Budget: $2,000 to $10,000, depending on scope and materials
Converting a garage into a dedicated workspace provides a centralized hub for woodworking, crafting, or automotive repairs while reducing clutter in the rest of your home. Warm weather is ideal for tasks like clearing out old clutter, painting walls, and installing proper ventilation. Also, working with garage doors wide open ensures excellent airflow when applying floor epoxy, wood stains, or adhesives. Plus, completing the renovation during the summer means you will be ready to enjoy this space when harsh winter temperatures arrive.

Important Considerations Before Starting
- Layout and zones: Map out every inch, being sure to group related tools together (like placing saws and clamps near the bench) and establishing distinct zones for cutting, painting, or storage.
- Power and electrical: Since garages tend to have limited electrical outlets, determine how many more outlets you will need and where to access them to charge batteries, run heavy machinery, and plug in other equipment without overloading circuits.
- Climate and comfort: Plan for ventilation and insulation to ensure a safe, comfortable space.
- Safety requirements: Ensure your plans include a ventilated cabinet for flammables and paints, a first aid kit, and a fire extinguisher.
Basic Steps for Completion
- Prepare the shell and entryway: Before organizing the space, address any structural, electrical, or garage door repairs with qualified professionals. For a budget-conscious upgrade, focus the DIY scope on decluttering, lighting, storage, and creating a work surface.
- Insulate and ventilate: Install insulation in the walls and ceiling, and add energy-efficient impact windows to regulate temperatures.
- Upgrade the flooring: Level the concrete slab if necessary. Then apply a durable epoxy coating or lay down interlocking rubber floor tiles to improve grip and support.
- Set up the workbench: Position a sturdy, waist-high work space like the VEVOR Adjustable Workbench as the centerpiece. Make sure the bench is made of hardwood or reinforced plywood.
- Install lighting and storage: Hang energy-efficient LED lights directly over work zones and utilize vertical space by installing wall shelves, pegboards, and overhead racks.
Budget-Friendly Tips
Building your dream workshop doesn’t have to break the bank. You can cut costs by repurposing used industrial carts, bins, and racks for storage solutions; purchasing tools secondhand online or at garage sales; buying materials in bulk; and maintaining your existing tools and equipment so they don’t need to be replaced as often.ls in bulk; and maintaining your existing tools and equipment so they don’t need to be replaced as often.
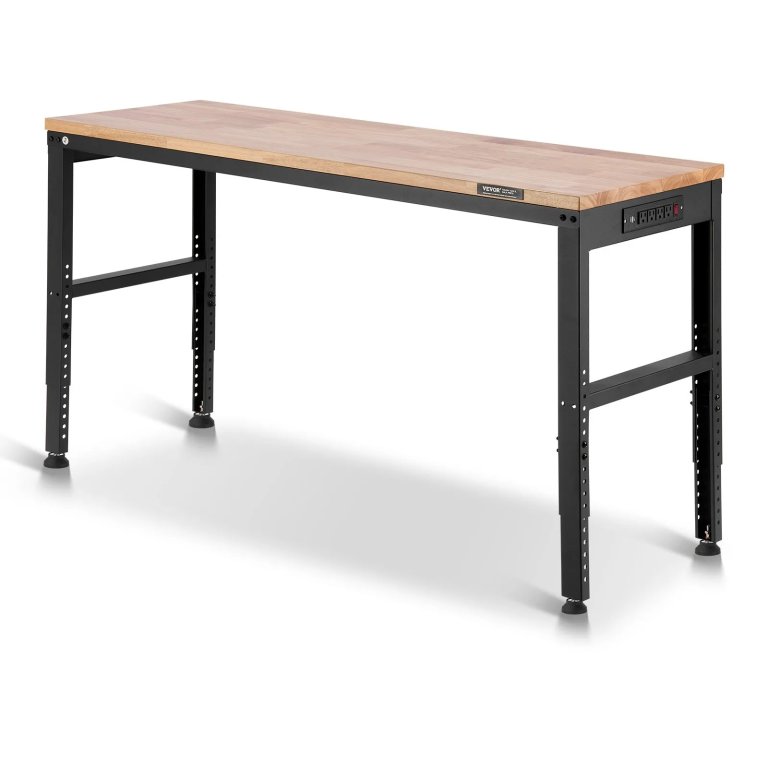
Photo: VEVOR
VEVOR Adjustable Workbench
This height-adjustable hardwood workbench holds up to 2,000 pounds and provides ample space for tools and tasks like carving, drilling, and welding.
Photo: VEVOR
The post Your Ultimate Summer Project Guide on a Budget appeared first on Bob Vila.